Water marble nail art design
 For the water marble design we need to have:
- Glass of water
- Nail base (base coat nail polish)
- Nail polish – in different colors
- Top coat nail polish
- Skewer or a chop stick
You can make marble design on a fake nails or on your own nails, just make sure that you have prepared your nails before the procedure.
Timing is very important, because the nail polish hardens quickly on the water surface, so make sure that all the bottles are opened and ready.
Try to use new nail polish, which is not thick or quick drying, but more washy. The new nail polish will stay on the surface on the water, but the old one maybe won’t. So try to use a good quality, new nail polish with liquid and even consistency. The water must be warm – not cold, not too hot, but warm. Avoid well ventilated areas, because the nail polish will dry too quickly on the water surface.
Steps:
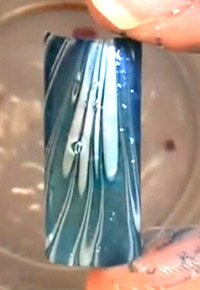
Fill the glass with water, almost to the lip. Add the preferable colors by placing each drop of nail polish gently onto the surface of the water.
Use a chopstick, pin or needle, dragging it from one edge to the other to create the desired marble look. Do it quickly.
Insert the nail or your tip into the water.
Remove the excess nail polish while the tip is submerged.
Once the edges have been cleaned, remove the nail from the water. If you made this to your own, natural nail – remove any excess polish from the skin around the nail using cotton bud and polish remover.
Apply a top coat.
Source: oceasia.com.au
Hits: 35840 | Leave a comment
About the Author